Overview
Vocode supports using agents with inbound and outbound phone calls. Users can create their own agents and use them to fulfill a variety of use cases like information collection, appointment scheduling, sales, customer support, and more.Requirements
- Ngrok (used to host the
TelephonyServerlocally) - ffmpeg
a. If you have Homebrew installed, run
brew install ffmpeg - Redis
a. If you have Homebrew installed, run
brew install redis - (optional) Docker
Environments
- Copy the
.env.templatefile and fill in the values of your API keys. You’ll need to get API keys for:
- Deepgram (for speech transcription)
- OpenAI (for the underlying agent)
- Azure (for speech synthesis)
- Twilio (for telephony)
- Set up hosting so that Twilio can hit your server. An easy way to do this is
ngrok: in our code we set it up to be running on port 3000, run:
.env without https://, e.g.
Telephony Server
TheTelephonyServer is–as implied by the name–a server that is responsible for
receiving and making phone calls.
The server is built using FastAPI and utilizes Twilio for telephony services.
Clone the Vocode repo or copy the Telephony app directory.
Running the server
Pick one of these two ways to run the server: 1. Run everything with Docker, 2. Run Python directlyOption 1: Run everything With Docker
- Build the telephony app Docker image. From the
telephony_appdirectory, run:
- Run the application using
docker-compose. From thetelephony_appdirectory, run:
Option 2: Run Python directly
Run the following steps from thetelephony_app directory.
- Install Poetry and install dependencies.
- Run Redis with the default port of 6379.
- Run the server with
uvicorn(should be already installed in step 1).
Setting up an inbound number
- Create a Twilio account
- Once inside your dashboard, go to Phone Numbers -> Manage -> Buy a number to get a phone number.
- Then, go to Phone Numbers -> Manage -> Active Numbers and select the number you want to set up.
- Update the config to point the Webhook URL to
https://<YOUR BASE URL>/inbound_call- if you’re usingngrok, it looks likehttps://asdf1234.ngrok.app/inbound_call
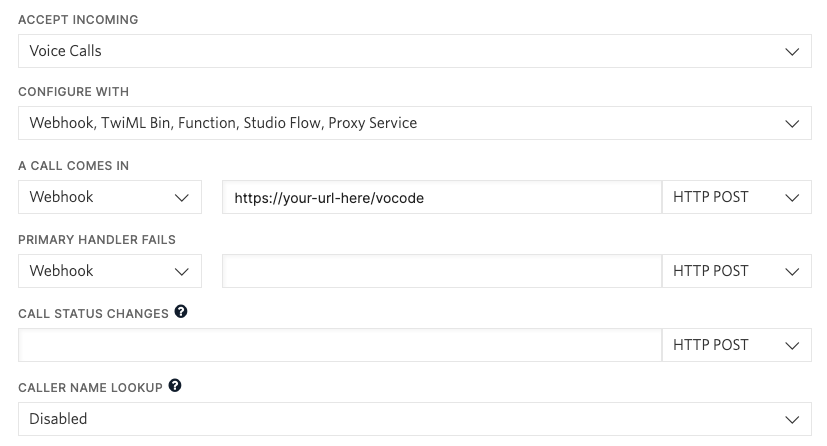
- Hit Save and call the number!
Executing outbound calls
Make sure the server we just set up is already running. Then, inoutbound_call.py
Replace the to_phone with the number you want to call and the from_phone with the number you want to call from. In order to make a call from the from_phone, you must have access to it via Twilio (either a number purchased via Twilio or verify the caller ID).
Run the script with poetry run python outbound_call.py.
Configuration
Both theOutboundCall (in outbound_call.py) and InboundCallConfig (in telephony_app.py) classes can accept a TranscriberConfig, AgentConfig
or SynthesizerConfig - the default transcriber is Deepgram and the default synthesizer is Azure.
This example sets up an agent that spells every word that is sent to it - any text-in, text-out function can be turned into a voice conversation by subclassing BaseAgent and creating an AgentFactory.
AgentFactory instance is passed into the TelephonyServer in telephony_app.py.
We provide a small set of agents with already created AgentConfigs, including, importantly, one that sets up ChatGPT with a configured prompt: see our Python Quickstart for more info.
Accessing call information in your agent
We store theto and from numbers in the ConfigManager - so
if you’d like to access them in your agent, you can instantiate the manager to hook into the same Redis instance: